GTD App supports two types of data source.
In this section, we discuss Container Managed Data Source.
To learn GTD-APP Managed Data Source, please click here.
| Adding JNDI Data Source |
First, please make sure that the database and connection pool in J2EE works.
1. Login GTD Server, using user with administrator/developer privilege, navigate
to Connection Pool/Data Source Manager
2. Click "![]() New
JNDI Data Source " in the bottom-left of Connection Pool/Data
Source Manager.
New
JNDI Data Source " in the bottom-left of Connection Pool/Data
Source Manager.
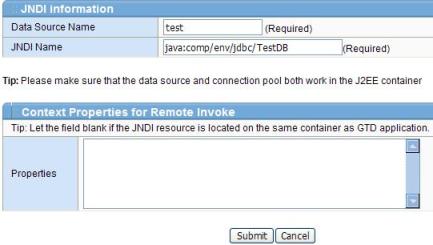
3. You will see a page simular to the figure below. Fill in the information required, and then click Submit button.
Example:

Sample properties for Weblogic
java.naming.provider.url=t3://server-name:7001
java.naming.factory.initial=weblogic.jndi.WLInitialContextFactory
java.naming.security.principal=username
java.naming.security.credentials=thepassword
If the JNDI resource is hosted in Tomcat, the JNDI name starts with java:comp/env/
If the JNDI resource is hosted in Weblogic, the JNDI name may starts with java/, For example a tipical JNDI name java/TestDB.
If you are not sure the content of properties, please let it blank.